> ## Documentation Index
> Fetch the complete documentation index at: https://docs.adstellar.ai/llms.txt
> Use this file to discover all available pages before exploring further.
# Getting Started with AdStellar
> Welcome to AdStellar AI! Once you're inside the platform, getting set up takes just a few minutes. Learn how to connect your Meta account, link an ad account, import campaigns, and launch your first AI-powered campaign.
## Setup Overview
Your Setup page includes four steps:
1. Connect your Meta account
2. Connect an ad account
3. Import campaigns
4. Set campaign goals
You can complete these steps in any order, but we recommend following them from top to bottom. Let's walk through them.
***
## Step 1: Connect Your Meta Account
To launch and manage campaigns, AdStellar AI needs permission to access your Meta ad accounts and performance data.
### How to connect
### AdStellar AI uses Meta permissions to:
* Read campaign performance
* Create and publish ads
* Read audience data
* Read pixel data
* Sync campaign performance data to AdStellar for reporting
Your data is never shared and is only used to power your campaigns.
***
## Step 2: Connect an Ad Account
Once your Meta profile is connected, the next step is to link a Meta Ad Account to your workspace. AdStellar AI uses this ad account to sync data, import campaigns, and publish new AI-generated campaigns on your behalf.
### How to connect an ad account
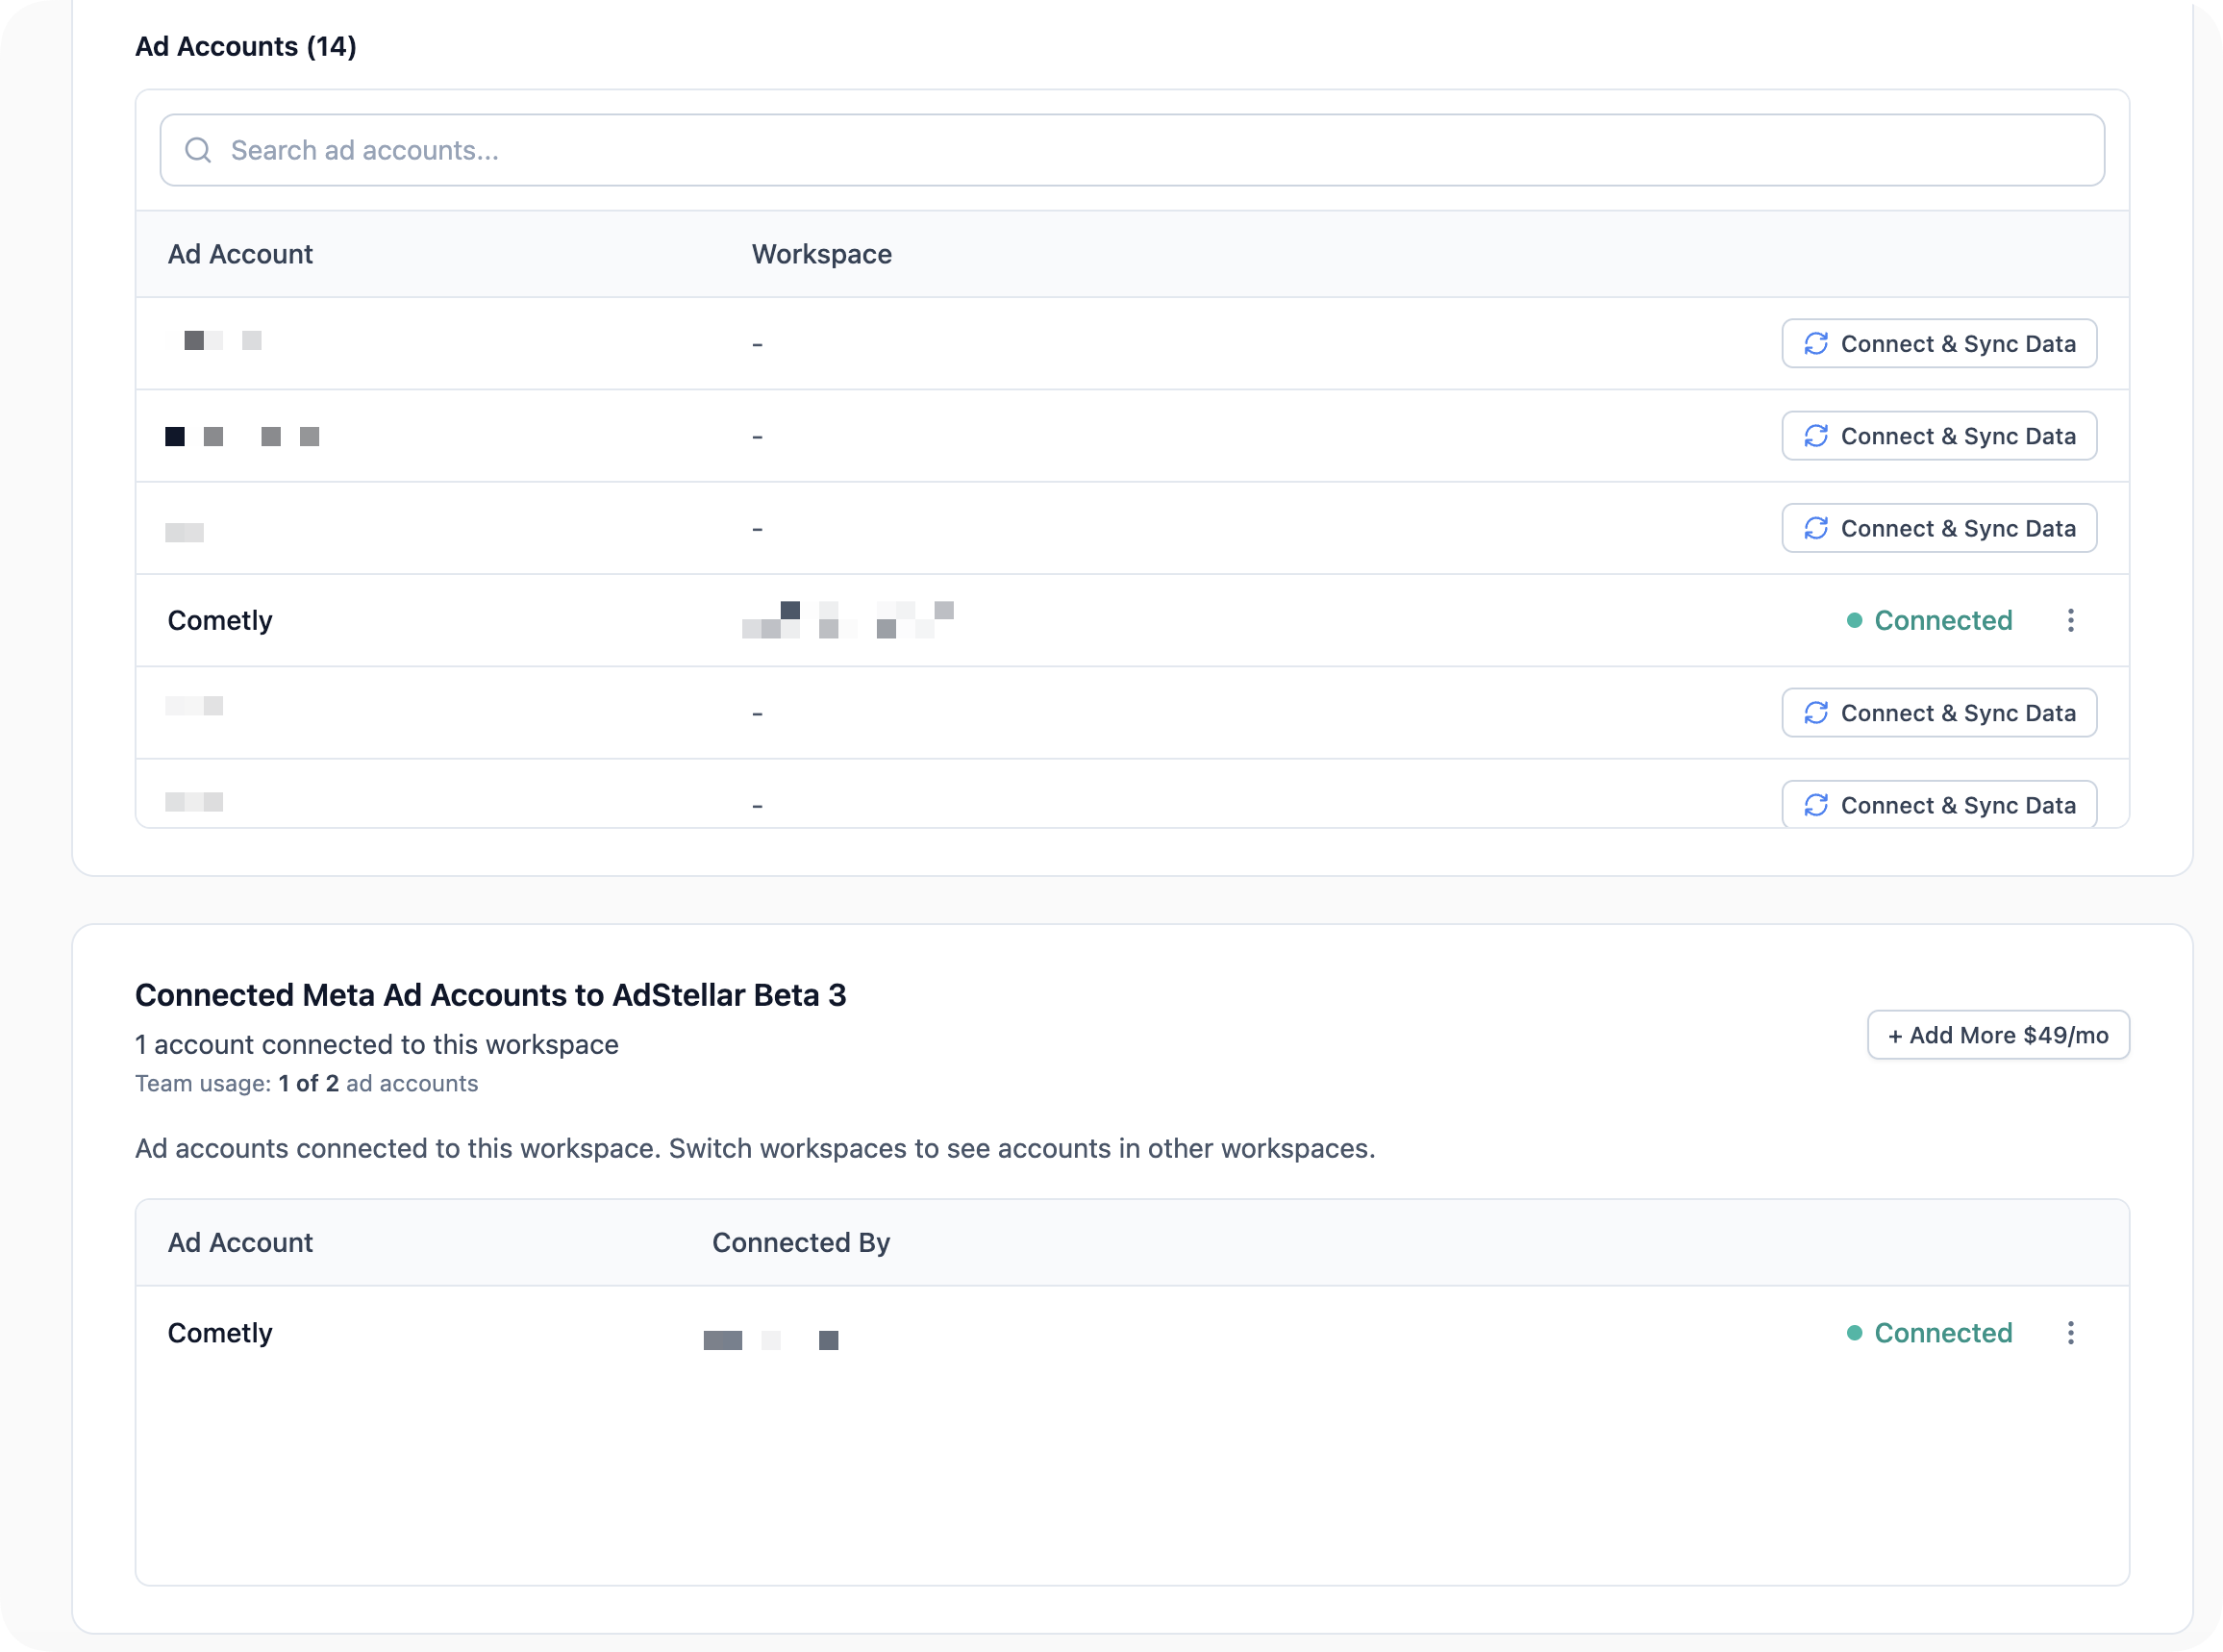 Once connected, AdStellar AI will automatically begin syncing your campaign data every hour.
### Ad accounts
You can connect **unlimited ad accounts** on every plan, at no extra cost — connect as many as you manage.
### If you don't see your ad account
If an ad account is missing from the list:
* Ensure you have **Admin** or **Advertiser** access inside Meta Business Manager
* Click **Resync** to refresh your ad account list
* Confirm the ad account is active and not disabled by Meta
* Ask the Business Manager owner to update your permissions if needed
Once your access is corrected, it will automatically appear and can be connected.
***
## Step 3: Import Campaigns
Importing your historical Meta campaigns gives your AI engine more data to learn from, helping generate stronger ad recommendations and insights. This step is optional, but highly recommended. Importing your past campaigns allows AdStellar AI to learn from your historical performance, including your ad copy, headlines, audiences, and results, giving you stronger, more personalized AI recommendations.
### How to import
**Campaign Import Times:** This may take 10-15 minutes depending on the size of the campaign (number of ad sets and ads). You can close this panel and come back later. Your import will continue in the background.
Once connected, AdStellar AI will automatically begin syncing your campaign data every hour.
### Ad accounts
You can connect **unlimited ad accounts** on every plan, at no extra cost — connect as many as you manage.
### If you don't see your ad account
If an ad account is missing from the list:
* Ensure you have **Admin** or **Advertiser** access inside Meta Business Manager
* Click **Resync** to refresh your ad account list
* Confirm the ad account is active and not disabled by Meta
* Ask the Business Manager owner to update your permissions if needed
Once your access is corrected, it will automatically appear and can be connected.
***
## Step 3: Import Campaigns
Importing your historical Meta campaigns gives your AI engine more data to learn from, helping generate stronger ad recommendations and insights. This step is optional, but highly recommended. Importing your past campaigns allows AdStellar AI to learn from your historical performance, including your ad copy, headlines, audiences, and results, giving you stronger, more personalized AI recommendations.
### How to import
**Campaign Import Times:** This may take 10-15 minutes depending on the size of the campaign (number of ad sets and ads). You can close this panel and come back later. Your import will continue in the background.
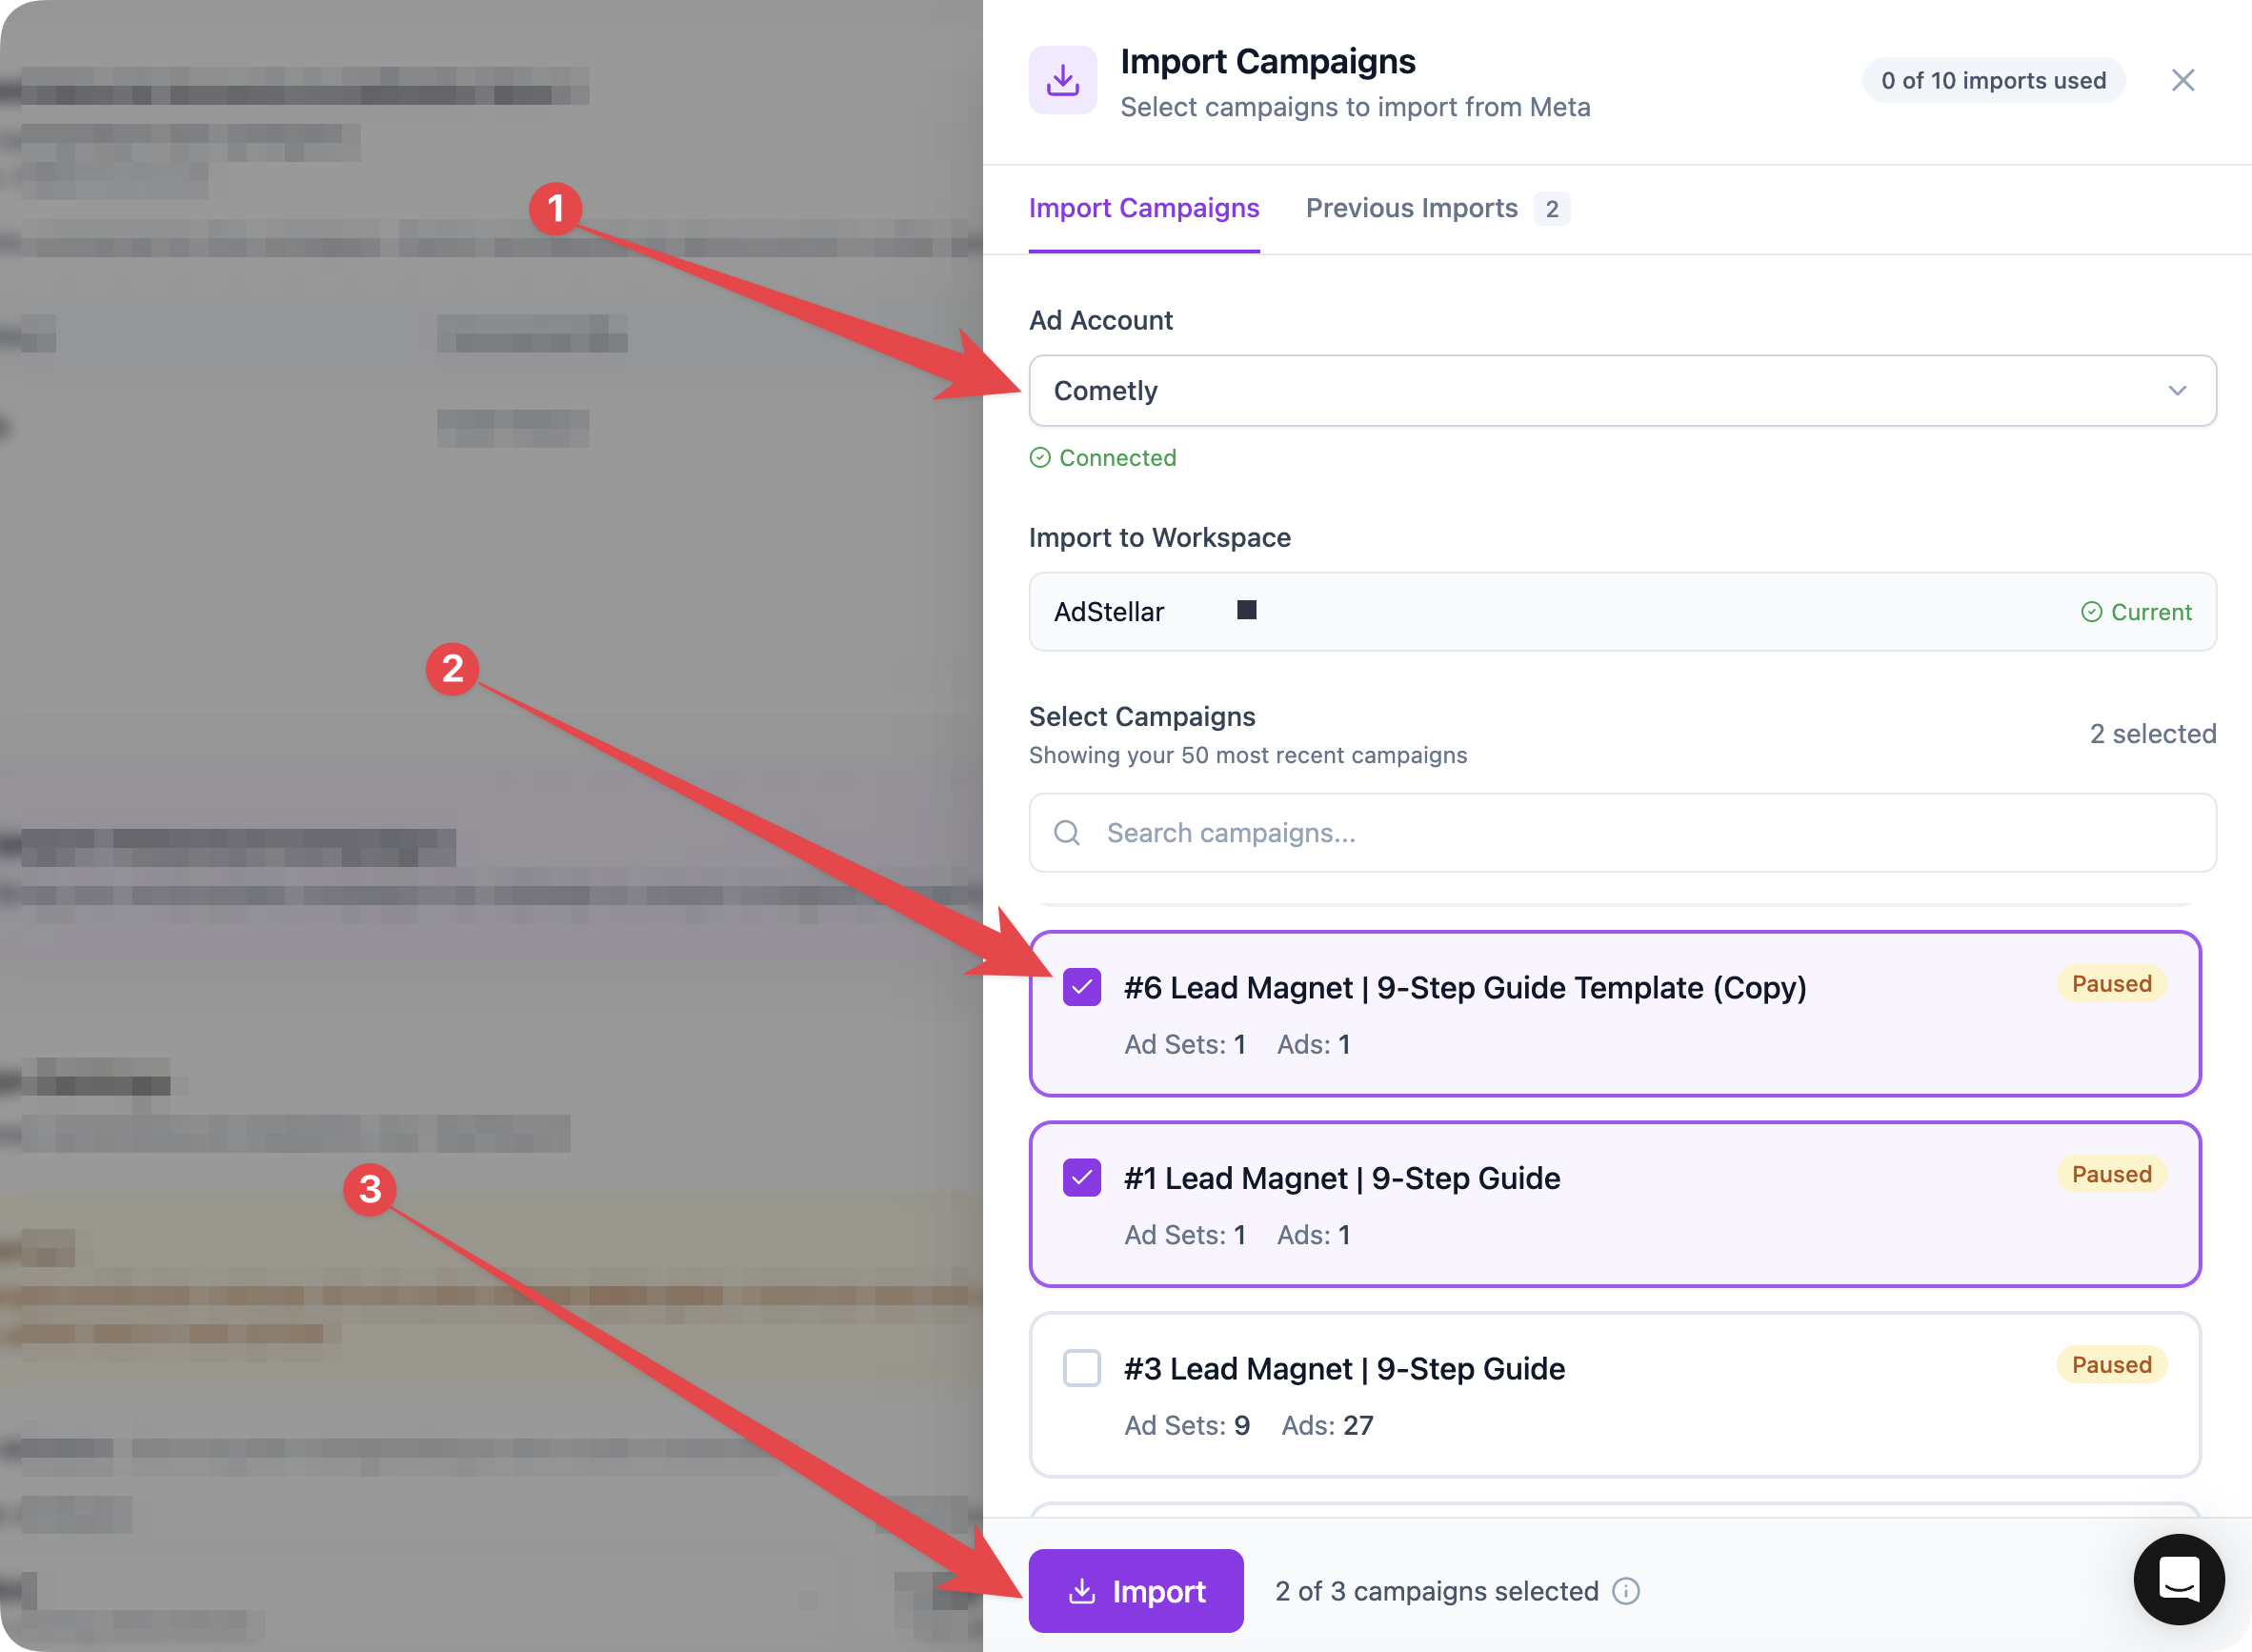 You can navigate to the **Performance** page on the app menu to validate the campaigns were imported correctly.
### Why import?
* AI learns from your past creative performance
* You unlock Creative Leaderboards and breakdowns
* You get a centralized performance history inside AdStellar AI
You can always import campaigns later from **Integrations → Meta**.
Campaign imports are unlimited on all plans. Import as many campaigns as you need for deeper AI learning and stronger recommendations.
***
## Step 4: Set Campaign Goals
This step is critical. Goals tell the AI what success looks like for your campaigns.
You can navigate to the **Performance** page on the app menu to validate the campaigns were imported correctly.
### Why import?
* AI learns from your past creative performance
* You unlock Creative Leaderboards and breakdowns
* You get a centralized performance history inside AdStellar AI
You can always import campaigns later from **Integrations → Meta**.
Campaign imports are unlimited on all plans. Import as many campaigns as you need for deeper AI learning and stronger recommendations.
***
## Step 4: Set Campaign Goals
This step is critical. Goals tell the AI what success looks like for your campaigns.
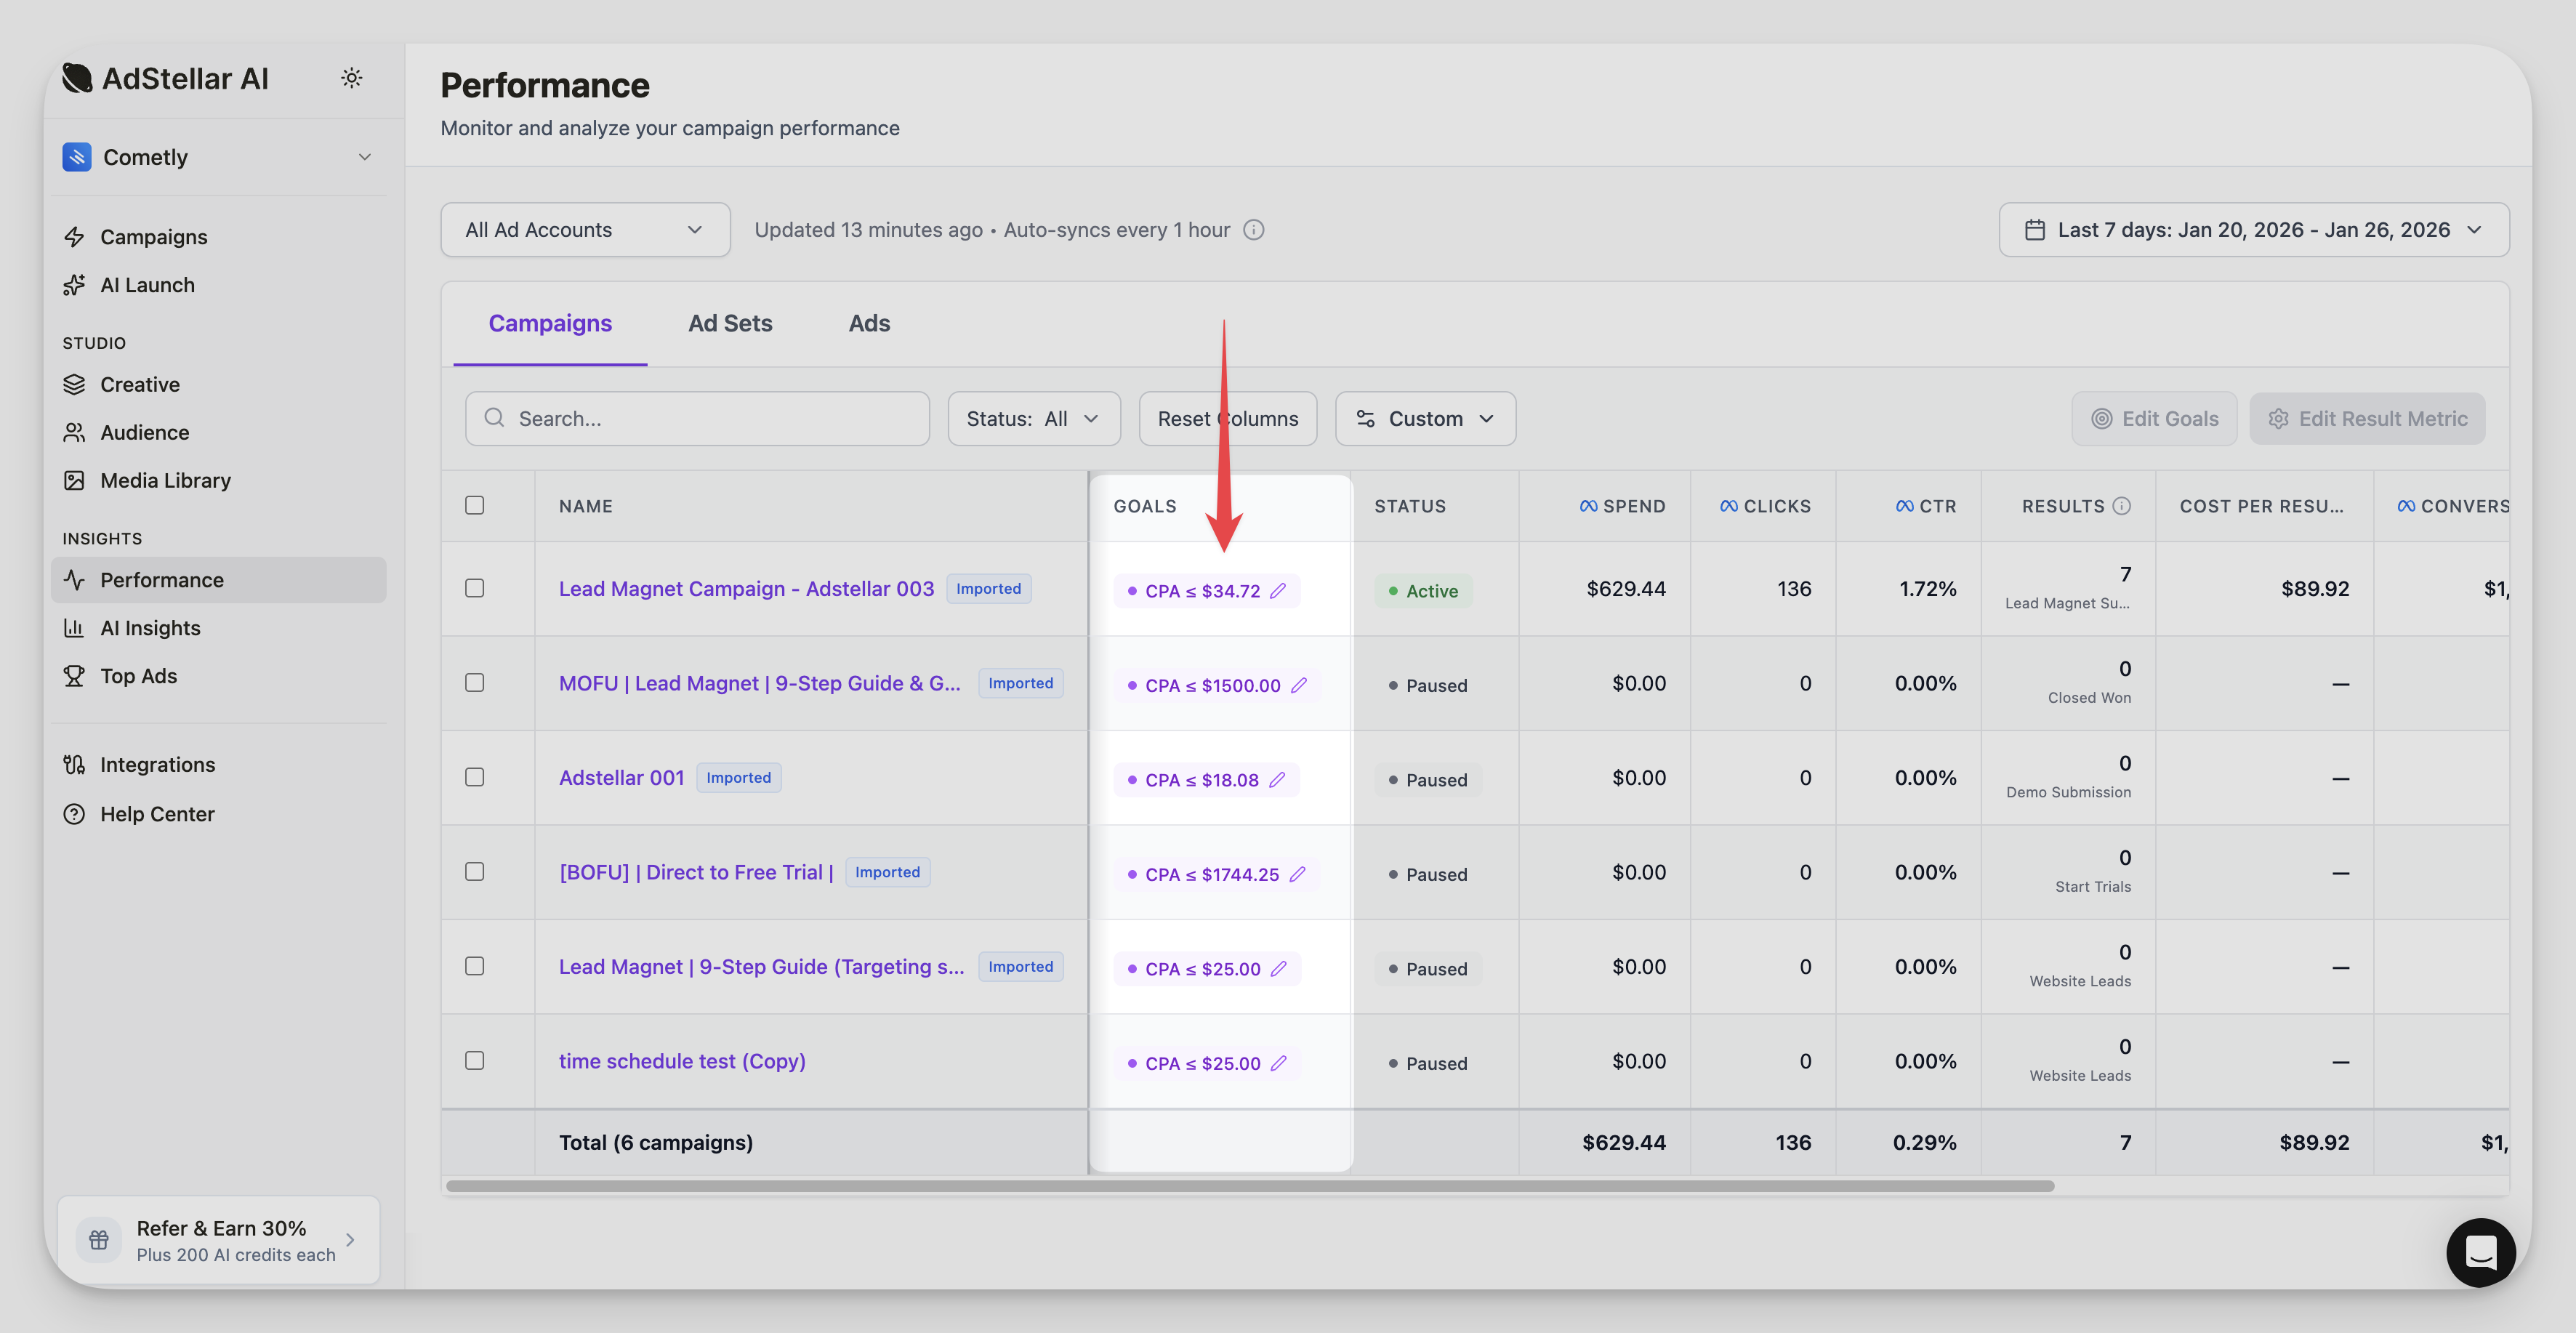 The AI uses these goals to analyze which combinations of headlines, creatives, and audiences are performing well versus underperforming. Any results costing more than your target will be flagged.
Set goals for every campaign you import.
***
## Step 5: Launch Your First AI Campaign
Once Setup steps 1-3 are complete, you are ready to launch your first campaign using the AI Campaign Builder.
### How to launch
After the AI campaign has been generated (this may take up to 5 minutes), you will be able to review the Campaigns, Ad Sets, and Ads within AdStellar prior to syncing to Meta.
After the sync to Meta has been completed, you will be able to turn on the Campaigns, Ad Sets, and Ads in Meta. Campaigns, Ad Sets, and Ads are **turned OFF by default** when they are synced to Meta.
### What the AI does for you
* Builds audiences based on your inputs
* Creates multiple ad variations
* Suggests high-performing creative combinations
* Structures ad sets for maximum testing
* Speeds up launching from hours to minutes
This is where AdStellar AI really shines.
### AI Credits
AI credits are the usage currency for AdStellar's AI-powered features. Credits are consumed when you generate images, videos, or launch AI-built campaigns.
* **Only AI-generated content uses credits.**
* **Manually created campaigns do not use credits.**
### Common credit costs
Credit costs vary by model. Here are the most common defaults:
| Feature | Default Model | Credits |
| ------------------------------- | ------------- | --------------------------- |
| **Image Generation** | Nano Banana 2 | 100 credits |
| **Image Editing** | Nano Banana 2 | 100 credits per edit |
| **Image Resize** | Nano Banana 2 | 100 credits per output size |
| **Video (up to 10s)** | Kling 3 Pro | 2,800 credits |
| **Video (up to 15s)** | Kling 3 Pro | 4,200 credits |
| **Talking Actor (up to 30s)** | Omnihuman 1.5 | 8,400 credits |
| **Lip-Sync Render (up to 10s)** | sync-3 | 2,200 credits |
| **AI Campaign Launch** | — | 100 credits |
See [Plans, Billing, and AI Credits](/billing/plans-credits#ai-credit-costs) for the full credit cost breakdown. Premium models and higher resolutions scale up from these baseline rates, and the exact cost is always shown before you generate.
Credits are granted monthly and expire 60 days after being granted. Bonus credits earned through referrals never expire. Image edits and resizes also consume credits each time a revision is applied. Lip-sync rendering is an optional step after video generation that perfects lip movements and audio quality.
[Learn more about AI Credits](/billing/plans-credits)
***
## Setup Complete
Once you finish all steps, your Setup checklist will show **100% complete**. From here, you can:
* Launch new AI campaigns anytime
* Explore Performance Insights
* Add team members
* Connect additional ad accounts
* Manage your billing and AI credits
* Import more campaigns
You're now fully ready to scale with AdStellar AI.
### Navigating Your Workspace
| Feature | What You'll Use It For |
| ------------------------------------------- | --------------------------------------------------------------------- |
| **Dashboard** | High-level overview of spend, launches, and insights |
| **Campaigns** | View and manage all active and historical campaigns |
| **AI Builder** | Build and launch new campaigns using AdStellar's AI |
| **AI Insights** | Creative performance, leaderboards, breakdowns |
| **Integrations** | Connect and manage Meta (ad accounts and imports), Slack, and Cometly |
| **Settings** (workspace menu) | Workspace preferences and team-wide defaults |
| **Billing & Subscription** (workspace menu) | Plan, AI credits, payment methods |
| **Team Members** (workspace menu) | Invite collaborators and manage their roles |
### FAQs
#### Can I connect multiple ad accounts?
Yes. You can connect unlimited ad accounts on every plan, at no extra cost.
#### Do I have to import campaigns?
No. Importing is optional, but recommended for stronger AI output and better insights.
#### Can I invite team members?
Yes. Invite unlimited collaborators from your **workspace menu (top-left) → Team Members**, at no extra cost.
#### Can I change my plan later?
Yes. You can upgrade or downgrade from **Billing & Subscription** at any time.
#### What if I need help during setup?
You can reach us anytime:
* Click the in-app **chat icon**
* Email **[support@adstellar.ai](mailto:support@adstellar.ai)**
### Next Steps
Now that you're set up, here are a few powerful features to try:
1. Explore the AI Campaign Builder to create your first AI-powered campaign
2. Review your Performance Insights and analytics dashboards
3. Set up Creative Leaderboards to track your top-performing ads
4. Invite your team members to collaborate on campaigns
5. Connect additional ad accounts to manage more brands
6. Connect Slack to use the Agent right from your team's channels — see [Use the Agent in Slack](/getting-started/use-agent-in-slack)
Welcome to **AdStellar AI** -- let's launch exceptional campaigns together.
The AI uses these goals to analyze which combinations of headlines, creatives, and audiences are performing well versus underperforming. Any results costing more than your target will be flagged.
Set goals for every campaign you import.
***
## Step 5: Launch Your First AI Campaign
Once Setup steps 1-3 are complete, you are ready to launch your first campaign using the AI Campaign Builder.
### How to launch
After the AI campaign has been generated (this may take up to 5 minutes), you will be able to review the Campaigns, Ad Sets, and Ads within AdStellar prior to syncing to Meta.
After the sync to Meta has been completed, you will be able to turn on the Campaigns, Ad Sets, and Ads in Meta. Campaigns, Ad Sets, and Ads are **turned OFF by default** when they are synced to Meta.
### What the AI does for you
* Builds audiences based on your inputs
* Creates multiple ad variations
* Suggests high-performing creative combinations
* Structures ad sets for maximum testing
* Speeds up launching from hours to minutes
This is where AdStellar AI really shines.
### AI Credits
AI credits are the usage currency for AdStellar's AI-powered features. Credits are consumed when you generate images, videos, or launch AI-built campaigns.
* **Only AI-generated content uses credits.**
* **Manually created campaigns do not use credits.**
### Common credit costs
Credit costs vary by model. Here are the most common defaults:
| Feature | Default Model | Credits |
| ------------------------------- | ------------- | --------------------------- |
| **Image Generation** | Nano Banana 2 | 100 credits |
| **Image Editing** | Nano Banana 2 | 100 credits per edit |
| **Image Resize** | Nano Banana 2 | 100 credits per output size |
| **Video (up to 10s)** | Kling 3 Pro | 2,800 credits |
| **Video (up to 15s)** | Kling 3 Pro | 4,200 credits |
| **Talking Actor (up to 30s)** | Omnihuman 1.5 | 8,400 credits |
| **Lip-Sync Render (up to 10s)** | sync-3 | 2,200 credits |
| **AI Campaign Launch** | — | 100 credits |
See [Plans, Billing, and AI Credits](/billing/plans-credits#ai-credit-costs) for the full credit cost breakdown. Premium models and higher resolutions scale up from these baseline rates, and the exact cost is always shown before you generate.
Credits are granted monthly and expire 60 days after being granted. Bonus credits earned through referrals never expire. Image edits and resizes also consume credits each time a revision is applied. Lip-sync rendering is an optional step after video generation that perfects lip movements and audio quality.
[Learn more about AI Credits](/billing/plans-credits)
***
## Setup Complete
Once you finish all steps, your Setup checklist will show **100% complete**. From here, you can:
* Launch new AI campaigns anytime
* Explore Performance Insights
* Add team members
* Connect additional ad accounts
* Manage your billing and AI credits
* Import more campaigns
You're now fully ready to scale with AdStellar AI.
### Navigating Your Workspace
| Feature | What You'll Use It For |
| ------------------------------------------- | --------------------------------------------------------------------- |
| **Dashboard** | High-level overview of spend, launches, and insights |
| **Campaigns** | View and manage all active and historical campaigns |
| **AI Builder** | Build and launch new campaigns using AdStellar's AI |
| **AI Insights** | Creative performance, leaderboards, breakdowns |
| **Integrations** | Connect and manage Meta (ad accounts and imports), Slack, and Cometly |
| **Settings** (workspace menu) | Workspace preferences and team-wide defaults |
| **Billing & Subscription** (workspace menu) | Plan, AI credits, payment methods |
| **Team Members** (workspace menu) | Invite collaborators and manage their roles |
### FAQs
#### Can I connect multiple ad accounts?
Yes. You can connect unlimited ad accounts on every plan, at no extra cost.
#### Do I have to import campaigns?
No. Importing is optional, but recommended for stronger AI output and better insights.
#### Can I invite team members?
Yes. Invite unlimited collaborators from your **workspace menu (top-left) → Team Members**, at no extra cost.
#### Can I change my plan later?
Yes. You can upgrade or downgrade from **Billing & Subscription** at any time.
#### What if I need help during setup?
You can reach us anytime:
* Click the in-app **chat icon**
* Email **[support@adstellar.ai](mailto:support@adstellar.ai)**
### Next Steps
Now that you're set up, here are a few powerful features to try:
1. Explore the AI Campaign Builder to create your first AI-powered campaign
2. Review your Performance Insights and analytics dashboards
3. Set up Creative Leaderboards to track your top-performing ads
4. Invite your team members to collaborate on campaigns
5. Connect additional ad accounts to manage more brands
6. Connect Slack to use the Agent right from your team's channels — see [Use the Agent in Slack](/getting-started/use-agent-in-slack)
Welcome to **AdStellar AI** -- let's launch exceptional campaigns together.